
Where to Cut LED Strip Lights
Quick Overview
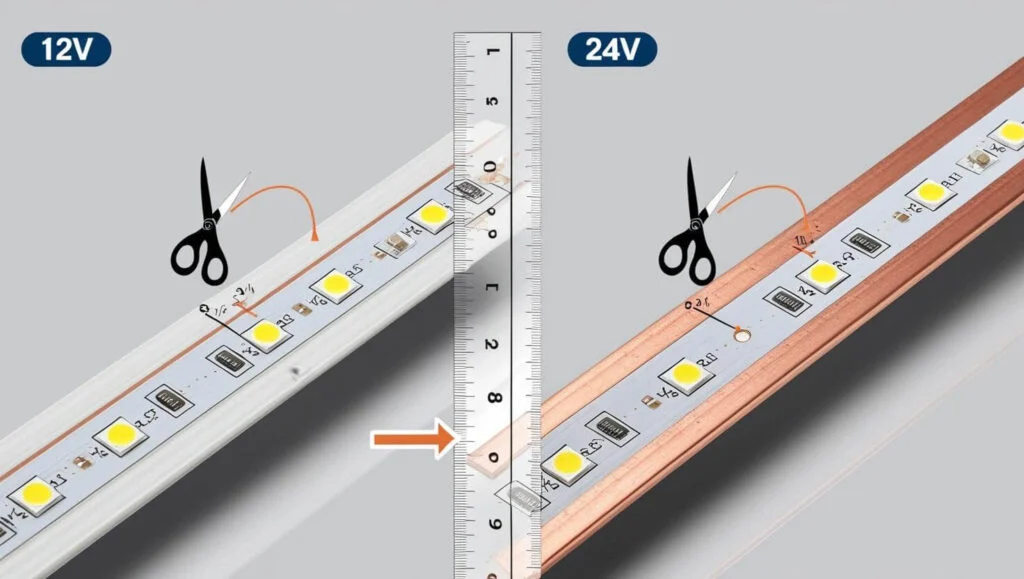
LED strip lights should only be cut at the marked cutting points shown on the strip. These points are usually identified by a scissor icon, a straight black line, or copper pads placed between LED sections. Cutting in the correct spot helps the remaining strip continue working properly without damaging the electrical circuit.
Quick Guide for Cutting LED Strip Lights
- Find the cutting marks or copper pads on the strip
- Turn off the power before cutting
- Use sharp scissors for a clean straight cut
- Cut directly through the centre of the copper pads
- Never cut outside the marked lines, as this can damage the LEDs
- Use LED strip connectors if you want to reconnect separate pieces
Most LED strip lights have cutting points every few inches, depending on the strip type and voltage. Cutting at the wrong location can stop part of the strip from working or cause permanent electrical damage.
Detailed Information For Your Best Concept.
Cutting LED strip lights isn’t difficult, as long as you cut in exactly the right place. One wrong snip and you can destroy a whole section. Whether you’ve just bought a roll and need it to fit under cabinets or you’re wondering can you cut LED lights and put them in different rooms? This guide answers every question clearly and practically.
Where to Cut LED Strip Lights:
Every LED strip light has designated cut points, usually marked by a line or a pair of copper dots (or both). These cut points appear every few centimetres along the strip, typically every 2.5cm, 5cm, or 10cm depending on the strip voltage and brand.
Look for a solid line printed across the strip, often with a small scissors icon.
Look for exposed copper pads on either side of the line—these are the connection points for future soldering or connectors.
Never cut anywhere else. Cutting between cut points will break the circuit and kill the LEDs beyond that point, even if you reconnect the strip later.
If you cut exactly on the line through the copper pads, both halves remain functional and can be reconnected or used independently.
How Do LED Light Strips Work When Cut?
LED strip lights are built in small segments—typically groups of three LEDs wired in series, with multiple groups connected in parallel along the strip. Each segment has its own current‑limiting resistor.
When you cut along the designated line:
The segment you cut off is electrically isolated from the power source.
The remaining strip, still connected to power, works perfectly as long as the cut didn’t damage any components.
The cut‑off piece can be powered separately if you connect new wires or a fresh power supply.
This segmented design is why you can trim a 5‑metre strip into multiple shorter lengths and power each one independently—so long as you cut correctly and supply the right voltage.
How to Cut LED Strip Lights: Step‑by‑Step
Unplug the strip from the mains before doing anything. Cutting a live strip can damage the LEDs, cause a short, or hurt you.
Measure your required length. Decide exactly how long you need each section to be.
Locate the nearest cut line. Count along the copper dots or printed lines until you find the one closest to your measurement. Cut only on the line; never adjust by a few millimetres into the LED zone.
Use sharp, precise scissors. Clean, flush‑cutting scissors or a sharp craft knife give the neatest result.
Make one single, straight cut right through the centre of the copper pads on the line.
Inspect the cut edge. Both sides should show clean, undamaged copper pads ready for connection.
If you’re asking how to cut led lights in the simplest terms: find the line, cut there, and never elsewhere.
How to Cut LED Strip Lights Without Soldering
Many people search how to cut led strip lights without soldering because they don’t own a soldering iron or don’t want to use one. The good news: you absolutely can cut and reconnect LED strips without soldering.
The two main methods:
1. Snap‑On / Clip‑On LED Strip Connectors
These are small plastic connectors with two hinged sides. You slide the cut end of the strip into the connector so the copper pads align with the metal contacts inside, then snap the lid shut. This creates a solid electrical connection without heat or solder.
Available in multiple types: strip‑to‑strip (to join two pieces), strip‑to‑wire (to attach a cable), corner connectors for 90° turns, and power‑in connectors.
Check your strip width: LED strips come in 8mm, 10mm, and 12mm widths. Buy the connector size that matches your strip exactly.
Work with 2‑pin (single colour) and 4‑pin (RGB) strips—just ensure you get the correct pin count.
2. Solderless / Solder‑Free Clamp Connectors
Some brands, like Govee and Ksipze, sell bespoke solderless adaptors designed specifically for their strips. These are premium push‑in connectors that grip the copper pads firmly. They remove any guesswork and are much more reliable than cheap generic clips.
If you’re searching cutting led strip lights without connectors—meaning you want to cut and immediately reuse the strip without buying extra parts—your only real option is soldering wires to the copper pads. Connector‑free, bare‑end reuse isn’t possible because the copper pads need something to transfer power, whether that’s a clip‑on connector, solder, or a purpose‑built adaptor.
How to Connect LED Strip Lights After Cutting
Once you’ve cut your strip, you have a few options to make it work again.
Option 1: Solder Wires Directly
Solder two short wires (positive and negative) onto the copper pads at the cut end. This is the most durable method but requires basic soldering skill and a steady hand.
Clean the pads with isopropyl alcohol first.
Pre‑tin both the wire and the pad.
Apply heat briefly to avoid lifting the copper from the strip.
Option 2: Use Strip‑to‑Strip Connectors
If you’re simply rejoining two pieces that were cut apart (for going around a corner, for example), a clip‑on strip‑to‑strip connector works perfectly. Align both cut ends in the connector (polarity must match: + to +, – to –) and snap it shut.
Option 3: Use Strip‑to‑Wire Connectors
When you need to run a cable from the strip end to a new location or a different power supply, use a strip‑to‑wire connector. Push the cut end of the strip into the connector, and the other side of the connector accepts bare wires going to a power supply or another strip.
Option 4: Re‑Power a Cut‑Off Section Independently
The section you cut off is now a standalone strip. Attach a new power connector (soldered or clip‑on) to its beginning and plug it into a separate LED driver (matching voltage). That’s how you use cut pieces in different rooms—explained next.
Can You Cut LED Lights and Put Them in Different Rooms?
Yes, absolutely. This is a common project. Can you cut led lights and put them in different rooms is a sound yes—if you meet a few conditions.
Each cut length must:
Be cut on the designated cut line so all segments are intact.
Have its own power connection—via soldered wires, a clip‑on power connector, or an adaptor.
Be powered by its own driver (or share a driver of sufficient wattage, with cables run between rooms, which is less common and requires careful cable routing through walls).
Be installed on a clean, dry surface.
The most practical setup: you buy a single long reel, cut it into pieces to fit under the kitchen cabinets, the TV unit, and the bookshelf in the study, then power each piece from its own small driver (or a multi‑output driver properly rated). Don’t try to run one long cable between rooms from a single strip because the voltage drop will cause uneven brightness and it’s rarely worth the complexity.
Where to Cut LED Strip Govee
Govee LED strips (popular models like the H6190, H6180, etc.) all have clearly marked cut lines.
Cut points are marked with a line and a scissors symbol.
For most Govee RGBIC strips, the cut interval is every 10cm or 25cm depending on the exact model. Check your strip; it’s printed on the surface.
Important for Govee RGBIC: These strips use individually addressable ICs that control blocks of LEDs. When you cut, you must not cut through an IC chip. The cut line is positioned so you don’t damage the control circuit. If you cut elsewhere, the custom colour segments won’t function beyond the cut.
Govee sells official solderless connectors in some product lines, or you can use third‑party 4‑pin 10mm or 12mm clip connectors (check your strip width first).
After cutting, Govee strips can be powered separately using a Govee‑compatible power adapter or a generic constant‑voltage LED driver matching the voltage (usually 12V or 24V—check your Govee model).
If you search where to cut led strip govee, the answer is: exactly on the printed line with the scissors icon, nowhere else.
How to Cut Ksipze LED Lights
Ksipze strips are a popular budget‑friendly brand widely available online. They follow the same universal rules.
Ksipze strips have cut points every 2.5cm or 5cm marked by a line across the copper pads.
For the standard single‑colour (2‑pin) strips, the cut points are obvious—thick white line and copper pads.
For Ksipze RGB strips (4‑pin), the line is still visible but you’ll see four copper pads, not two. Cut exactly on the line.
How to cut ksipze led lights: Use sharp scissors, cut on the line, and if connecting afterwards, use a 2‑pin or 4‑pin connector matching the strip width (typically 10mm for Ksipze strips—measure it to be sure).
Ksipze strips sometimes come with a small pack of connectors in the box. If not, generic 10mm clip connectors from any hardware or online store work fine.
No special brand‑specific trick is needed—Ksipze strips are straightforward, as long as you respect the cut line.
Cutting LED Strip Lights Without Connectors: Is It Possible?
The phrase cutting led strip lights without connectors usually means: “Can I cut the strip and still use it immediately, without buying extra clip‑on pieces?” The answer is only yes if you solder. You cannot just press two cut ends together and expect them to work—there’s no physical or electrical bond.
If you’re mid‑project and don’t have connectors, you have three choices:
Solder wires to the copper pads—reliable and permanent.
Temporarily tape the two ends together—this is unsafe, unreliable, and not recommended. It will flicker and may short.
Wait and buy the correct connectors. They’re inexpensive and widely available (Amazon, Screwfix, Toolstation, B&Q). It’s the simplest path.
For a quick same‑day fix, soldering is the way to go if you have the kit. If not, clip‑on connectors are your best investment.
Common Mistakes When Cutting LED Strip Lights
Cutting between cut points: Instantly kills the segment. The copper pads are missing, so you cannot reconnect.
Cutting with the strip still powered: Risk of short‑circuit and damage to the power supply.
Using the wrong size connector: An 8mm connector on a 10mm strip won’t grip firmly, leading to flickering.
Not matching polarity: When reconnecting, always match the + and – markings. Reversed polarity won’t light the strip and can damage it.
Forcing connectors shut: Misalignment between copper pads and connector teeth is the main cause of failure. Line them up carefully.
Ignoring voltage: Every cut piece still needs the correct voltage. If you cut a 24V strip into five pieces, each piece still needs 24V, not a lower voltage.
Quick Summary: Cutting LED Lights at a Glance
| Question | Answer |
|---|---|
| Where to cut? | On the marked line / copper pads only |
| Can you cut then reconnect without soldering? | Yes, using clip‑on LED connectors |
| How to connect cut pieces? | Solder, clip connector, or re‑power separately |
| Can cut pieces go in different rooms? | Yes, each piece needs its own power feed |
| Govee cut point? | On the scissor‑marked line; don’t cut IC chips |
| Ksipze cut point? | On the copper pad line; 2‑pin or 4‑pin |
| Cut without connectors? | Only if soldering; bare ends cannot join without a connector |
| Will the remaining strip still work? | Yes, if cut on the line and still powered |
FAQs
Where exactly can I cut LED strip lights?
Only cut along the designated cut line, which is usually a solid white or black line printed across the copper pads. You’ll often see a small scissors icon there too. Cutting anywhere else will permanently damage that segment.
What happens if I cut an LED strip light in the wrong place?
The LEDs beyond the cut will stop working, and the segment between the wrong cut and the next official cut point will be ruined because you’ve broken the circuit and likely damaged the copper traces.
Do I need any special tools to cut LED strip lights?
No. A sharp pair of scissors or a sharp craft knife works perfectly. Just make sure the strip is unplugged before you cut.
Can I still use the leftover piece after cutting?
Absolutely. As long as you cut on the marked line, the leftover section can be powered separately—either by soldering wires to its copper pads or using a clip‑on connector.
How do I reconnect LED strip lights after cutting without soldering?
Use snap‑on or clip‑on LED strip connectors. These small plastic clips open, let you slide the cut end in so the copper pads align with the metal teeth inside, and snap shut to create a reliable connection.
What type of connector do I need after cutting?
It depends on your strip. You’ll need a connector that matches your strip’s width (commonly 8mm, 10mm, or 12mm) and the number of pins (2‑pin for single colour, 4‑pin for RGB, 5‑pin for RGBW). Strip‑to‑strip, strip‑to‑wire, and corner connectors are all available.
Will cutting the strip make the remaining lights dimmer?
No. LED strip lights are built in parallel segments. Cutting a section off the end does not affect the brightness of the remaining strip, provided the power supply is still adequate.
Can I cut LED strip lights anywhere for a custom fit?
No, you cannot cut between the marked cut points. The copper pads at those lines are where power can enter or exit a segment. Between the lines, the circuit is closed, and cutting there will break the strip.
How often are the cut lines on an LED strip?
It varies by strip type and voltage. Most strips have cut points every 2.5cm, 5cm, or 10cm. The higher the voltage (e.g., 24V), the longer the segment between cuts can be.
Can I cut an LED strip that is still plugged in?
Never. Always disconnect the strip from the power source before cutting. Cutting a live strip can cause a short circuit, damage the LEDs, and even give you an electric shock.
Why does my reconnected strip flicker after cutting?
Flickering usually happens because the clip connector isn’t gripping the copper pads firmly enough, the polarity is reversed, or the connector doesn’t match the strip width. Remove the connector, check alignment, and snap it shut again.
Do I have to solder LED strip lights after cutting?
No. Soldering is the most durable and professional method, especially for permanent installations or tight spaces, but high‑quality solderless connectors work well for most home projects and save time.
Why did my LED lights stop working after I cut them?
The most likely cause is that you cut outside the official cut line, breaking the internal circuit. Other reasons include: the connector isn’t gripping the pads tightly enough, the polarity is reversed, or the strip was accidentally damaged while being handled. Re‑cut cleanly at the next correct line and try again with a fresh connector.
What are common mistakes when cutting LED lights?
Cutting between cut points (kills the segment).
Cutting with the strip still powered (risk of short‑circuit).
Using a connector of the wrong width or pin count.
Not matching + and – when reconnecting.
Forcing a connector shut without properly aligning the copper pads.
Failing to test the strip after each step.
What is the best way to reconnect a cut LED strip?
You have three reliable options:
Solderless clip‑on connectors – quick, cheap, and perfect for most home projects.
Soldering – the most secure and professional method.
Re‑powering the cut piece – attach a new power cable and driver to the cut‑off portion to use it independently.
Do I need to seal the cut end?
If the cut end will be exposed to moisture or dust (e.g., in a kitchen or bathroom), cover it with a silicone end cap or a piece of heat‑shrink tubing. This stops the copper pads from corroding or short‑circuiting against metal surfaces.
